Emergency First Aid: 7 Things to Do BEFORE the Vet
The silence of a peaceful afternoon is suddenly shattered by a yelp, a crash, or the sound of your pet struggling to breathe. In that split second, your heart drops, and adrenaline surges. Whether it’s a car accident, a sudden ingestion of a toxic substance, a deep gash from a backyard scuffle, or a mysterious seizure, an emergency involving your pet is one of the most harrowing experiences a pet owner can face.
When your pet is in crisis, every second counts. While your first instinct is to rush to the car, what you do in the few minutes before you leave for the clinic can determine the outcome of the situation. Medical professionals often refer to the “Golden Hour”—the period immediately following a traumatic injury when prompt medical treatment has the highest likelihood of preventing death.
This guide is designed to empower you with the knowledge and tools needed to bridge the gap between the moment an emergency occurs and the moment your pet reaches professional medical hands. Here are the 7 critical things you must do before you get to the vet.
1. Master Your Own Biology: Stay Calm and Assess the Scene
It sounds like a cliché, but it is the single most important rule of first aid: Stay calm.
When you panic, your body releases cortisol and adrenaline. Your heart rate spikes, your vision narrows (tunnel vision), and your ability to think logically diminishes. More importantly, your pet—who is already in pain or shock—is hyper-tuned to your emotions. If you are screaming or frantic, your pet’s heart rate will climb even higher, potentially exacerbating conditions like respiratory distress or internal bleeding.
Assess the Scene for Dangers
Before you rush to your pet’s side, take three seconds to scan the environment.
- Traffic: If the accident happened on the road, ensure you aren’t about to be hit by a car while trying to help.
- Electricity: If the pet was shocked by chewing a cord, ensure the power is off before touching them.
- Toxins: If they’ve eaten something, quickly identify what it was and save the packaging if possible.
- Environmental Hazards: Are there broken glass shards, aggressive animals, or fire nearby?
Check ABCs (Airway, Breathing, Circulation)
Perform a rapid assessment of your pet’s vitals:
- Airway: Is there something stuck in their throat?
- Breathing: Are they taking breaths? Is it labored, shallow, or non-existent?
- Circulation/Pulse: Can you feel a heartbeat or a pulse on the inner thigh (femoral artery)?
2. Secure the Situation: Restrain and Protect Yourself
Even the gentlest, most loving Labrador can bite when in intense pain. Pain triggers a primitive “fight or flight” response. If you are bitten or scratched severely, you become a second victim, and your ability to help your pet is compromised.
The Art of the Muzzle
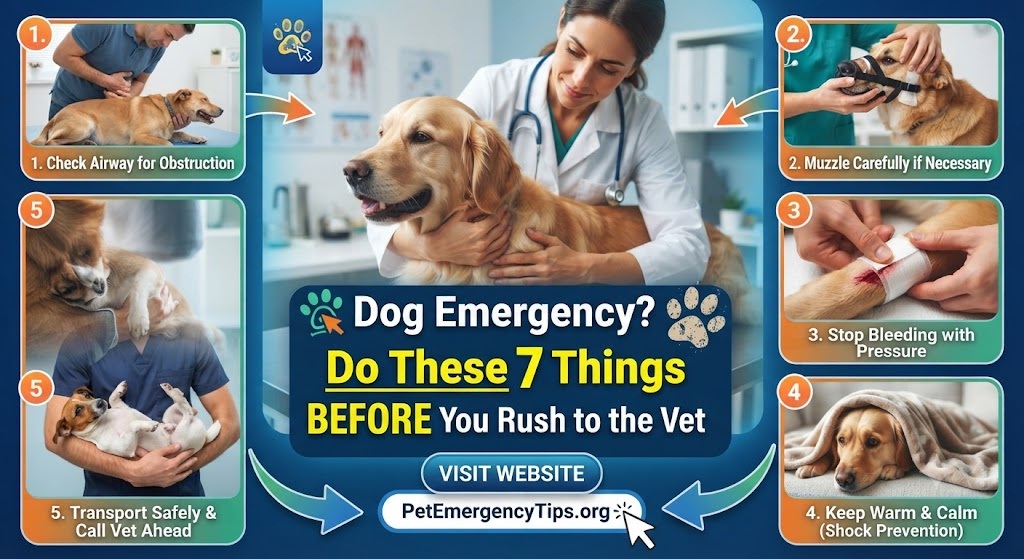
If your pet is conscious and not vomiting, a muzzle is a primary safety tool.
- Commercial Muzzles: If you have one, use it.
- Improvised Muzzles: You can use a roll of gauze, a pair of pantyhose, or even a soft necktie. Loop it over the nose, tie it under the jaw, and bring the ends back behind the ears to tie them.
- When NOT to Muzzle: Never muzzle a pet that is vomiting, having difficulty breathing, or belongs to a flat-faced (brachycephalic) breed like Pugs or French Bulldogs, as this can cause suffocation.
Using Towels and Blankets
For cats and small dogs, the “Purrito” method is highly effective. Wrap the pet snugly in a thick towel. This keeps their limbs tucked in (preventing scratches) and provides a sense of security. For larger dogs, a heavy blanket can be used to wrap the body to prevent them from thrashing and further injuring themselves.
3. The Lifeline Call: Notify the Emergency Clinic
Never just show up at a veterinary clinic unannounced during an emergency. A phone call made before you leave the house is a vital link in the chain of survival.
Why Calling Ahead Matters
- Preparation: The clinic can prepare a “crash table” with oxygen, IV fluids, and emergency medications before you arrive.
- Specialization: Not all clinics are equipped for 24-hour emergencies or specific surgeries. They might redirect you to a specialized trauma center, saving you precious travel time.
- Instruction: The veterinary technician on the phone can provide real-time instructions specific to your pet’s situation.
Information to Provide
When you call, be concise:
- State your name and the pet’s breed/age.
- State the nature of the emergency (e.g., “My dog was hit by a car” or “My cat is struggling to breathe”).
- State your estimated time of arrival (ETA).
- Mention any pre-existing conditions or medications your pet is currently taking.
4. Immediate Wound Management: Stop the Bleeding
If your pet is bleeding, you need to act fast to prevent hemorrhagic shock. The goal is to keep the blood inside the body until the vet can repair the vessel.
Apply Direct Pressure
Take a clean cloth, sterile gauze pad, or even a clean t-shirt and press it firmly against the wound. Do not keep lifting the cloth to see if it has stopped; this disrupts the formation of clots. If the cloth soaks through, add another layer on top of the first one.
Use a Pressure Bandage
If you are alone and need to drive, you must secure the pressure. Wrap gauze or a bandage snugly over the wound site. It should be tight enough to stop the bleeding but not so tight that it cuts off circulation to the rest of the limb (check for warmth in the toes).
The Tourniquet Debate
Tourniquets should be a last resort, used only for life-threatening arterial bleeding in a limb that cannot be controlled by pressure. If used incorrectly, they can cause permanent nerve damage or lead to the loss of the limb. Only use a tourniquet if the bleeding is “pumping” and you have a long drive ahead.
Managing Evisceration
In severe trauma where internal organs are protruding, do not try to push them back in. Instead, cover the area with a clean, damp cloth (use sterile saline or clean water) and keep the pet as still as possible.
5. Poisoning Protocols: To Vomit or Not to Vomit?
Poisoning is one of the most common pet emergencies. Whether it’s chocolate, grapes, rat poison, or human medication, the response time is critical.
Gather Information
Grab the package or bottle of whatever the pet ingested. If they vomited, take a sample in a plastic bag. This helps the vet identify the toxin and the specific dosage.
The Danger of Inducing Vomiting
Many owners reflexively try to make their pet vomit using hydrogen peroxide. Do not do this without professional advice.
- Caustic Substances: If your pet swallowed bleach, drain cleaner, or kerosene, inducing vomiting will burn the esophagus a second time on the way up.
- Neurological Symptoms: If the pet is lethargic, dizzy, or seizing, they may aspirate the vomit into their lungs, causing fatal pneumonia.
Contact Poison Control
While you are in the car (if someone else is driving), call the ASPCA Animal Poison Control Center (888-426-4435) or the Pet Poison Helpline. They have a massive database of toxins and can provide the vet with a specific treatment protocol by the time you arrive.
6. Respiratory and Cardiac Support: CPR and Choking
If your pet has stopped breathing or their heart has stopped, you are their only hope for those first few minutes.
The Heimlich Maneuver for Pets
If your pet is choking:
- Open the mouth: Look for an obstruction. If you can see it and easily grab it, do so. Be careful not to push it further down.
- Small Pets: Hold them up by their hind legs and give a few firm shakes.
- Large Pets: If they are standing, wrap your arms around their abdomen just below the rib cage and give a sharp upward and forward thrust. If they are lying down, place one hand on their back and use the other to push the abdomen upward and forward toward the chest.
Basic Pet CPR
If there is no pulse:
- Positioning: Place the pet on their right side on a firm surface.
- Compressions: For most dogs, place your hands over the widest part of the chest. For deep-chested dogs like Greyhounds, place hands over the heart. For small dogs and cats, use one hand to wrap around the chest.
- Rate: Aim for 100-120 compressions per minute (the beat of “Stayin’ Alive”). Compress the chest by about 1/3 to 1/2 of its width.
- Breaths: Close the pet’s mouth and breathe directly into their nose. Give 2 breaths for every 30 compressions.
7. Strategic Transportation: The Safe Journey
How you move your pet can prevent “secondary injuries,” especially in cases of spinal trauma or broken bones.
Creating a Stretcher
For large dogs, use a flat board, a piece of plywood, or a rigid sled to keep the spine neutral. If a board isn’t available, a heavy blanket can be used as a “soft stretcher” with one person at each corner to keep the pet level.
Minimizing Movement
If you suspect a broken limb, do not try to “set” the bone. Simply try to keep the limb supported and prevented from swinging. You can use a rolled-up magazine or newspaper as a temporary splint, secured with tape or cloth, but only if the pet allows it without struggling.
Managing Temperature (Shock)
Pets in shock often suffer from a drop in body temperature. Keep your pet warm by covering them with a blanket and keeping the car heater on (but not blowing directly on them). Conversely, if the emergency is heatstroke, turn on the AC, wrap them in cool (not ice-cold) wet towels, and get moving immediately.
The Essential Pet First Aid Kit: Be Prepared Before the Crisis
You shouldn’t be hunting for supplies while your pet is bleeding. A pre-assembled first aid kit kept in your car or a designated spot in your home is a lifesaver.
Must-Have Supplies:
- Contact Info: Phone numbers for your vet, the nearest 24-hour ER, and Poison Control.
- Absorbent Gauze Pads & Rolls: For wound dressing.
- Adhesive Tape: To secure bandages (do not use human band-aids on fur).
- Antiseptic Wipes or Betadine: For cleaning minor wounds.
- Hydrogen Peroxide (3%): ONLY to be used to induce vomiting if directed by a vet.
- Digital Thermometer: To check for fever or hypothermia (rectal is most accurate for pets).
- Saline Eye Flush: To rinse out debris or chemicals.
- Muzzle or strips of cloth.
- Blunt-ended Scissors: To cut away fur or bandages safely.
- Tweezers: For removing splinters or ticks.
- Corn Syrup or Honey: To rub on gums of diabetic pets or small puppies having a hypoglycemic (low blood sugar) episode.
Recognizing the Signs of Shock
Shock is a life-threatening condition where the circulatory system fails, preventing oxygen from reaching vital organs. Even if an injury looks “minor” on the outside, your pet could be in shock.
Signs to look for:
- Pale or White Gums: Press your finger against their gum; it should turn pink again within 2 seconds. If it stays white, they are in shock.
- Rapid, Weak Pulse: The heart is racing to make up for low blood volume.
- Cold Paws and Ears: Blood is being shunted away from the extremities to the core organs.
- Lethargy or Glazed Eyes: The pet may seem “out of it” or unresponsive.
If you see these signs, stop all home treatment and get to the vet immediately.
Seasonal Emergencies: Heat and Cold
The environment plays a huge role in pet emergencies.
Heatstroke (Hyperthermia)
If a pet’s body temperature rises above 104°F (40°C), organ failure begins.
- Signs: Excessive panting, bright red gums, thick saliva, vomiting, and collapse.
- Action: Move them to the shade. Use cool water (not ice water) to wet their fur. Focus on the head, neck, and under the limbs. Provide small sips of water, but do not force them to drink.
Hypothermia and Frostbite
- Signs: Shivering, muscle stiffness, pale skin (blue/grey in severe cases).
- Action: Wrap them in warm blankets. Use your own body heat to warm them. Do not rub frostbitten areas, as this can cause tissue damage.
Conclusion: You Are the Bridge to Safety
An emergency is a test of your bond with your pet and your ability to remain focused under pressure. While no one wants to imagine their pet in pain, being prepared is the greatest act of love you can provide.
Remember the sequence: Assess the danger, stay calm, secure the pet, call the vet, and stabilize the injury. Your role isn’t to be a surgeon or a pharmacist; your role is to be the “First Responder” who ensures your pet survives the journey to the clinic.
By taking these 7 steps, you aren’t just reacting to a crisis—you are actively saving a life. Keep your first aid kit ready, keep your vet’s number on speed dial, and take a deep breath. You’ve got this, and your pet is counting on you.