Emergency First Aid: 7 Things to Do BEFORE the Vet (Save a Life)
The clock is ticking. Your heart is racing. Perhaps your dog has just collapsed after a walk in the midday sun, or your cat has ingested something from the kitchen counter that you know is toxic. In these frantic moments, the difference between a tragic outcome and a heroic recovery often comes down to what happens in the first ten minutes.
While we all wish for a world where our pets are never in danger, emergencies are an inevitable part of animal ownership. As a pet parent, you are the first responder. You are the bridge between the accident and the operating table. Understanding emergency first aid isn’t just a “nice to have” skill—it is a critical component of responsible pet ownership.
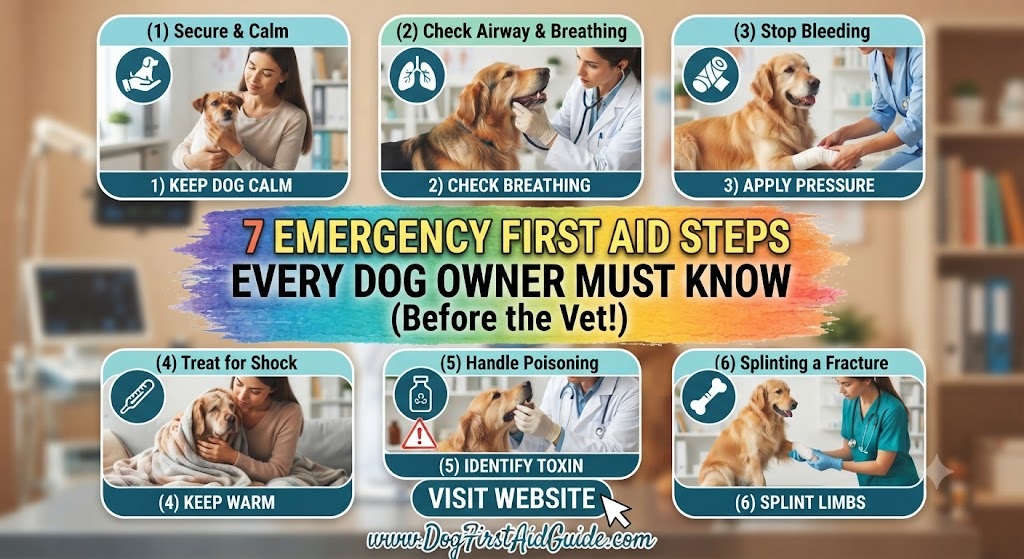
This comprehensive guide will walk you through the seven most critical actions you must take during a pet emergency before you even pull out of the driveway. These steps are designed to stabilize your pet, prevent further injury, and provide the veterinary team with the best possible chance of success.
1. Assess the Scene and Ensure Your Own Safety
The Psychology of a Hurting Pet
When an animal is in extreme pain or shock, their “fight or flight” instinct takes over. Even the gentlest, most loving Golden Retriever can bite reflexively if they are suffering from a broken limb or internal trauma.
- Approach with Caution: Speak in low, soothing tones. Avoid sudden movements.
- Muzzle if Necessary: Unless your pet is vomiting, gasping for air, or has a facial injury, a muzzle is often the safest way to provide first aid. If you don’t have a professional muzzle, a roll of gauze or even a soft necktie can be used as a makeshift muzzle to prevent a fear-based bite.
- Check for Environmental Hazards: If the emergency is a car accident, ensure you aren’t in the path of traffic. If it’s an electrocution (like chewing a cord), ensure the power is off before touching the pet.
Staying Calm is a Medical Necessity
Animals are incredibly sensitive to human cortisol levels. If you are screaming or panicking, your pet’s heart rate and blood pressure will spike, potentially worsening conditions like internal bleeding or respiratory distress. By maintaining a calm demeanor, you are physiologically helping your pet remain stable.
2. Check the “ABCs” (Airway, Breathing, Circulation)
Before you worry about a cut paw or a limp, you must ensure the “Engine” is running. In veterinary emergency medicine, we follow the ABC protocol.
Airway
Ensure nothing is obstructing the pet’s ability to move air.
- Action: Gently pull the tongue forward and look into the back of the throat. Use a flashlight if available. Be extremely careful of your fingers.
- What to look for: Clear out any blood, vomit, or foreign objects (like a ball or a piece of a toy) that might be blocking the windpipe.
Breathing
Is the chest rising and falling?
- The Mirror Test: If you aren’t sure, hold a small mirror or even your polished smartphone screen up to their nose. Look for the “fog” of a breath.
- The Tissue Test: Hold a single ply of tissue near the nostrils to see if it moves.
- Normal Rates: A resting dog usually breathes 10–30 times per minute; cats are similar. Rapid, shallow breathing (tachypnea) or heavy gasping (dyspnea) are signs of a major emergency.
1. Stay Calm and Quickly Assess the Situation
- Why staying calm helps your dog
- Check for immediate dangers
- Look for breathing and responsiveness
- Determine the type of emergency
- Protect yourself from accidental bites
2. Check Your Dog’s Airway, Breathing, and Circulation (ABC)
- How to tell if your dog is breathing
- Checking pulse and heart rate
- Signs of oxygen deprivation
- When CPR may be necessary
- What not to do during assessment
3. Control Severe Bleeding Immediately
- Applying direct pressure correctly
- Using clean cloths or bandages
- When to use a pressure bandage
- Recognizing internal bleeding
- Mistakes that can make bleeding worse
4. Handle Broken Bones and Serious Injuries Safely
- Signs of fractures or dislocations
- Keeping your dog still
- Creating a temporary splint (if appropriate)
- Safe lifting techniques
- Preventing further injury during transport
5. Respond to Choking, Poisoning, or Heatstroke
Choking
- Signs your dog is choking
- Safe ways to remove an obstruction
- When to seek immediate emergency care
Poisoning
- Common household toxins
- What information to collect before calling the vet
- Why you should never induce vomiting unless instructed
Heatstroke
- Early warning signs
- Safe cooling methods
- Dangerous cooling mistakes to avoid
6. Clean and Protect Wounds Properly
- Flushing wounds with clean water
- Applying pet-safe antiseptics
- Covering wounds with sterile bandages
- Preventing infection
- When wounds require emergency treatment
7. Transport Your Dog to the Vet Safely
- Keeping your dog calm during travel
- Using a blanket or board as a stretcher
- Calling the veterinary clinic ahead
- Bringing medication and medical history
- Monitoring your dog during transport
Essential Dog First Aid Kit Checklist
- Sterile gauze pads
- Self-adhesive bandages
- Antiseptic solution
- Digital thermometer
- Tweezers
- Blunt-tip scissors
- Disposable gloves
- Saline solution
- Tick remover
- Instant cold pack
- Emergency blanket
- Muzzle (if needed)
- Flashlight
- Emergency contact numbers
Common Dog Emergencies Every Owner Should Know
- Severe bleeding
- Choking
- Poisoning
- Heatstroke
- Seizures
- Allergic reactions
- Broken bones
- Burns
- Electric shock
- Snake bites
When to Go to the Emergency Vet Immediately
- Difficulty breathing
- Unconsciousness
- Continuous seizures
- Heavy bleeding that won’t stop
- Suspected poisoning
- Hit by a vehicle
- Severe burns
- Bloated or swollen abdomen
- Collapse or inability to stand
- Persistent vomiting with weakness
Dog First Aid Mistakes to Avoid
- Delaying veterinary care
- Giving human medications without veterinary advice
- Removing deeply embedded objects
- Using alcohol or hydrogen peroxide on serious wounds without guidance
- Forcing food or water on an unconscious dog
- Moving an injured dog roughly
- Ignoring signs of shock
Final Thoughts
Knowing these seven emergency first aid steps can make a critical difference while you’re on the way to veterinary care. First aid is meant to stabilize your dog—not replace professional treatment. Acting quickly, staying calm, and getting veterinary help as soon as possible gives your dog the best chance of recovery.
3. Control Life-Threatening Bleeding
Blood loss can lead to hypovolemic shock very quickly, especially in smaller breeds or cats. If you see active, spurting, or heavy bleeding, you must act immediately.
Direct Pressure
This is the gold standard for most wounds.
- Use a clean cloth, sterile gauze, or even a clean t-shirt.
- Apply firm, constant pressure directly over the wound.
- Do NOT lift the cloth to check if it has stopped. Doing so can tear away the clot that is beginning to form. If the blood soaks through, simply add another layer of cloth on top of the first.
Elevation
If the wound is on a limb or the tail, and there are no suspected fractures, elevate the injury above the level of the heart. Gravity will help slow the blood flow to the site.
The Truth About Tourniquets
In the past, tourniquets were discouraged for pet owners. However, in cases of severe arterial bleeding (bright red, pulsing blood) on a limb, a tourniquet can be life-saving.
- Use a wide band of cloth (never wire or thin string).
- Apply it between the wound and the heart.
- Note the exact time it was applied.
- Warning: A tourniquet is a “last resort” measure, as it can lead to limb loss if left on too long. Use it only when direct pressure fails.
4. Immediate Action for Choking: The “Pet Heimlich”
Choking is one of the most terrifying emergencies because you have only minutes to act.
For Small Dogs and Cats
- Pick the pet up by the hips and hold them upside down (gently).
- The movement and gravity may dislodge the object.
For Large Dogs (The Wheelbarrow Method)
- Keep the dog on all fours.
- Stand behind them and wrap your arms around their abdomen, just below the ribs.
- Make a fist and push up and forward toward the shoulders in a “J” motion.
- Alternatively, if the dog is too heavy, perform the “External Chest Compression”: with the dog on their side, place your hands on the widest part of the ribcage and deliver quick, firm thrusts.
The “Sweep”
Only attempt a finger sweep if you can clearly see the object and are certain you won’t push it further down. Use a “hooking” motion with your finger to pull the object out the side of the mouth.
5. Management of Heatstroke (Hyperthermia)
Heatstroke is a silent killer that causes multi-organ failure. If your pet is panting uncontrollably, has bright red gums, is drooling excessively, or has collapsed after being in a hot environment, you must begin the cooling process before the car ride.
The “Cool, Don’t Freeze” Rule
The biggest mistake owners make is using ice or ice-cold water. This causes the peripheral blood vessels to constrict (shrink), which actually traps the heat inside the body’s core, making the situation worse.
- Use Lukewarm/Cool Water: Spray the pet with a hose or wrap them in cool, wet towels.
- Focus on Key Areas: Apply cool water to the paw pads, the groin area, and the “armpits” where major blood vessels are close to the surface.
- Airflow: Position a fan to blow directly over the wet pet. This uses evaporative cooling to bring the temperature down safely.
- Stop at 103°F: If you have a rectal thermometer, stop the active cooling once the pet reaches 103°F (39.4°C) to prevent “overshooting” into hypothermia.
6. Poisoning: To Induce Vomiting or Not?
If you suspect your pet has eaten something toxic (chocolate, xylitol, rodenticide, lilies, etc.), your first call should be to a Pet Poison Helpline or your vet. However, the action you take next depends entirely on what was eaten.
When to Induce Vomiting
Vomiting is usually recommended for “soft” toxins like grapes, chocolate, or certain medications, provided the ingestion happened within the last 2 hours.
- How: Typically, 3% Hydrogen Peroxide is used (1 teaspoon per 5-10 lbs of body weight). Always consult a vet before doing this.
When NOT to Induce Vomiting
Never induce vomiting if:
- The substance was caustic/acidic (bleach, drain cleaner). It will burn the esophagus a second time on the way up.
- The substance was a petroleum product (gasoline). This can be inhaled into the lungs, causing fatal pneumonia.
- The pet is already lethargic, seizing, or unconscious.
Bring the Evidence
If you can, grab the packaging of whatever they ate. The specific chemical names and concentrations are vital for the vet to determine the correct antidote.
7. Stabilizing Fractures and Spinal Injuries
If your pet has been hit by a car or fallen from a height, assume there is a spinal injury or a fracture until proven otherwise.
The “Backboard” Technique
Moving a pet with a spinal injury can cause permanent paralysis.
- Slide a flat, rigid surface (a piece of plywood, a large baking sheet, or even a very stiff piece of cardboard) under the pet.
- Secure them to the board using soft ties or tape across the shoulders and hips, avoiding the neck and abdomen.
Splinting (Proceed with Caution)
In most cases, it is better to not splint a limb at home. An improperly applied splint can cause more pain and further displace the bone.
- The Exception: If the limb is dangling and you have a long journey, you can “bulk wrap” it. Use a thick layer of cotton or towels and wrap it loosely with vet wrap or tape. This provides support without applying direct pressure to the fracture site.
The Logistics: The “Go-Bag” and the Phone Call
Once you have performed the immediate stabilizing actions, the transition to the vet’s office must be seamless.
What’s in a Pet First Aid Kit?
You should have a dedicated box in your car or home containing:
- 3% Hydrogen Peroxide (Check expiration dates!).
- Saline Solution (For flushing eyes or wounds).
- Digital Thermometer and water-based lubricant.
- Sterile Gauze Pads and Rolls.
- Adhesive Tape and “Vet Wrap” (the stretchy stuff that sticks to itself).
- Blunt-tipped Scissors.
- Tweezers.
- Diphenhydramine (Benadryl) (For allergic reactions—get the dosage from your vet beforehand).
- Corn Syrup or Honey (For diabetic pets or those with low blood sugar).
- A Soft Muzzle.
The “Heads-Up” Call
Never just show up at an emergency vet if you can help it. Call them while you are en route. This allows the staff to:
- Prepare the oxygen cage.
- Have the crash cart ready.
- Ensure a surgeon or specialist is on-site.
- Provide you with specific instructions for the drive.
Identifying the “Silent” Emergencies
Not all emergencies involve blood or broken bones. As a pet owner, you must be able to recognize the signs of internal distress that require immediate veterinary intervention.
GDV (Bloat) in Dogs
Gastric Dilatation-Volvulus is a life-threatening condition where the stomach fills with gas and twists.
- Signs: Unproductive retching (trying to vomit but nothing comes up), a distended or “tight” abdomen, and extreme restlessness.
- Action: This is a 10/10 emergency. You have zero time. Get to the vet immediately.
Urinary Blockage (The “Blocked” Cat)
Male cats are prone to crystals or plugs in their urethra. If a cat cannot urinate, toxins build up in the blood, leading to heart failure within 24-48 hours.
- Signs: Straining in the litter box, crying out in pain, or over-grooming the genital area.
- Action: If your cat hasn’t produced urine in 12 hours, it is an emergency.
Seizures
While a single, short seizure isn’t always fatal, “Status Epilepticus” (a seizure lasting more than 5 minutes) or “Cluster Seizures” (multiple seizures in a row) cause the brain to overheat.
- Action: Clear the area of sharp objects. Do NOT put your hand in their mouth. Darken the room and keep it quiet. Time the seizure. If it lasts more than 3 minutes, get to the vet immediately.
Common First Aid Mistakes to Avoid
In the heat of the moment, well-meaning owners often make mistakes that complicate the vet’s job.
- Giving Human Painkillers: Never give Tylenol (Acetaminophen), Advil (Ibuprofen), or Aspirin to a pet unless specifically directed by a vet. Acetaminophen is highly toxic to cats, and NSAIDs can cause fatal stomach ulcers or kidney failure in dogs.
- Cleaning Wounds with Alcohol or Peroxide: While these are okay for the initial “gross” cleaning of a very dirty wound, they actually damage healthy tissue and slow down healing. For minor cuts, plain warm water or saline is best.
- Waiting to “See if They Get Better”: In emergency medicine, time is tissue. Waiting “until morning” for a pet that is lethargic or won’t eat can be the difference between a $500 clinic visit and a $5,000 ICU stay—or worse.
Conclusion: Empowerment Through Preparation
The bond we share with our pets is one of the most profound connections in life. They rely on us for food, shelter, and love—but most importantly, they rely on us to be their advocate when they are at their most vulnerable.
Emergency first aid isn’t about replacing the veterinarian; it’s about buying your pet the time they need to reach professional care. By staying calm, assessing the ABCs, controlling bleeding, and knowing when (and when not) to intervene, you become the hero your pet already thinks you are.
Pro-Tip: Print out this guide, or a simplified version of it, and keep it in your Pet First Aid Kit. In a real emergency, your brain may “fog up,” and having a physical checklist to follow can provide the clarity you need to save a life.
Take a moment today to find the pulse on your pet, locate their nearest emergency clinic, and program that number into your phone. Preparation is the greatest gift you can give your furry companion.